728x90
반응형
Eclipse-Oracle연동
★Database Connections 에서 연동을 진행
WINDOW-> SHOWVIEW-> OTHER -> data검색 -> Data source explorer

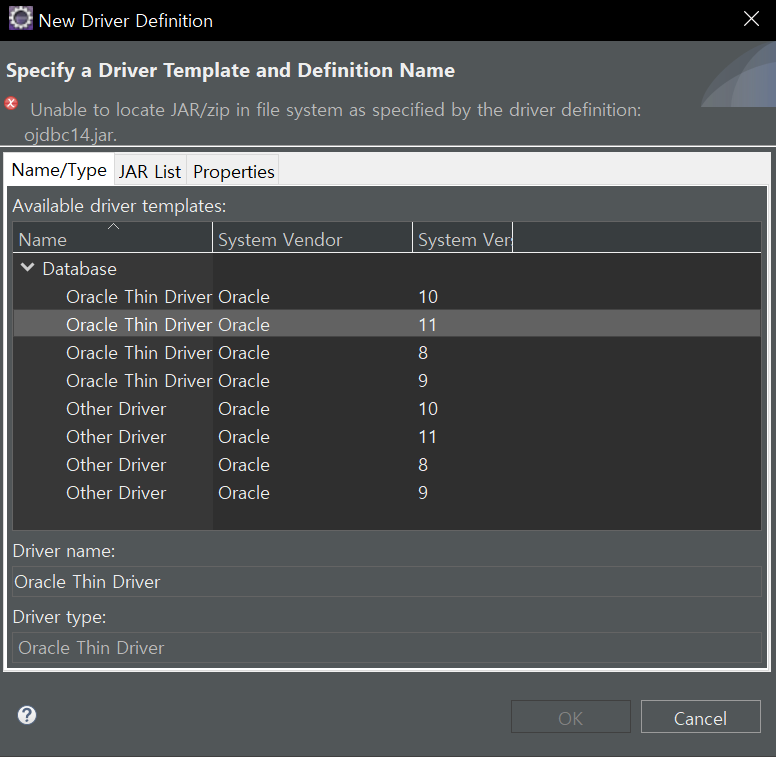
database connection-> 우클릭 뉴 ->oracle -> next ->

검색창 오른쪽 플러스버튼 ->

system version 11클릭 -> jar list -> 원래 있던건 remove -> ojdbc6.jar 넣어줌 ->
service name=xe로 입력 -> Host=localhost -> Port number 바꾸지않고 그대로 사용함 ->
아래 오른쪽 버튼 누르고 성공이 되었는지 확인해야 연동 완료!
아래 화면처럼 뜨면 성공!

JDBC 작업 전 처리
1. 프로젝트에서 SQL파일(test.sql) 생성
2. Connection profile에서 Type / Name / Database 설정 맞춰주기

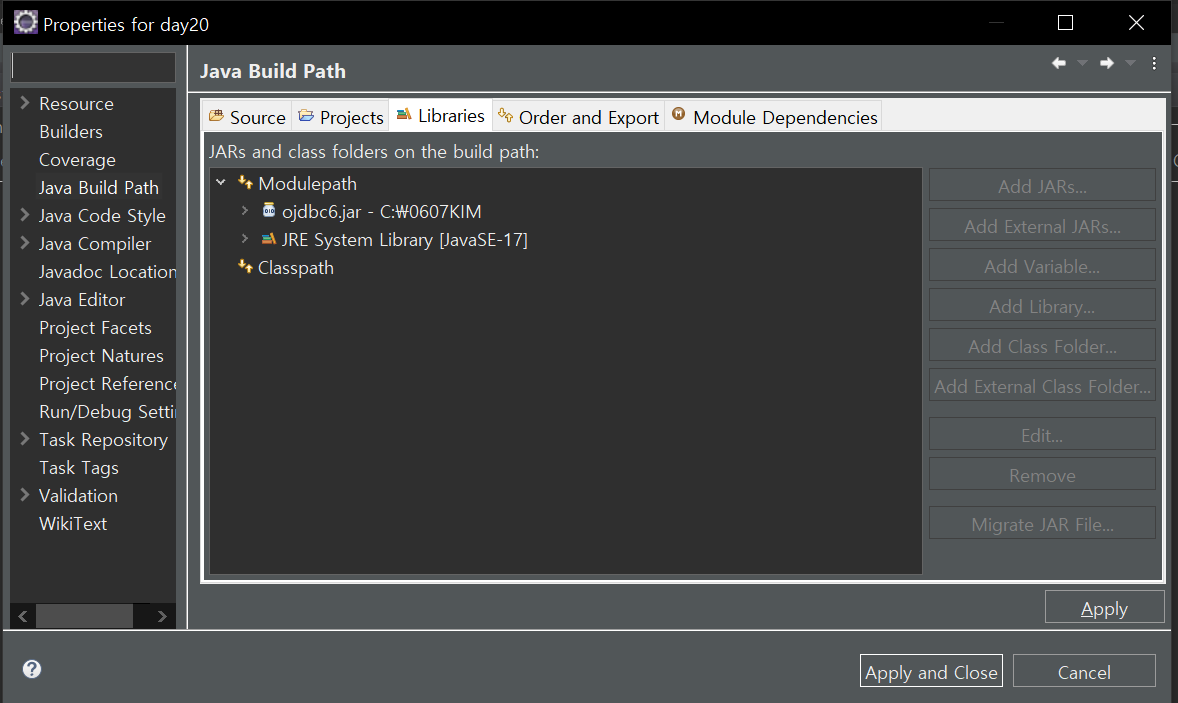
3. 해당 프로젝트에서 우클릭 -> Build Path -> Configure Build Path -> Libraries -> Add External Jars
-> 설치한 odjbc6.jar -> Aplly and Close

DB데이터 입출력
|
1
2
3
4
5
6
7
8
9
10
11
12
13
14
15
16
17
18
19
20
21
22
23
24
25
26
27
28
29
30
31
32
33
34
35
36
37
38
39
40
41
42
43
44
45
46
47
48
49
50
51
52
53
54
55
56
57
58
59
60
61
62
63
64
65
66
67
68
69
70
71
72
73
74
75
76
77
78
79
80
81
82
83
84
85
86
87
88
89
90
91
|
package class04;
import java.sql.Connection;
import java.sql.DriverManager;
import java.sql.SQLException;
import java.sql.Statement;
import java.util.Scanner;
public class Test01 {
public static void main(String[] args) {
// DBMS 선정(오라클)
// JAVA와 연동
// [JDBC]
//1. DBMS와 연동을 하기위한 드라이버가 필요
// 1) DBMS에 해당하는 드라이버 파일을 갖고있나?
// 2) 파일 데이터를 JAVA에 적재(load)했는가?
//.jar의 데이터를 JAVA에 load하는 방법
final String driverName="oracle.jdbc.driver.OracleDriver";
try {
Class.forName(driverName);
} catch (ClassNotFoundException e) { // 오타쓰면 잡아주기 위해서
// TODO Auto-generated catch block
e.printStackTrace();
}
//2. DB에 연결
final String url="jdbc:oracle:thin:@localhost:1521:xe";
final String user="kim";
final String password="1234";
Connection conn = null;
Statement stmt = null;
try {
conn = DriverManager.getConnection(url, user, password);
stmt=conn.createStatement(); //쿼리수행을 위해서 객체생성
Scanner sc=new Scanner(System.in);
// System.out.println("이름입력");
// String name=sc.next();
// System.out.println("나이입력");
// int age=sc.nextInt();
// System.out.println("성적입력");
// int score=sc.nextInt();
// System.out.println("번호입력");
// String phone=sc.next();
//
// //stmt 객체가 확보되어야
// //java에서 SQL문을 작성할 수 있게됨
// stmt.executeQuery("INSERT INTO STUDENT VALUES((SELECT NVL(MAX(NUM),0)+1 FROM STUDENT),'"+name+"',"+age+","+score+",'"+phone+"')");
// System.out.println("로그 : DB연결하여 쿼리문 실행완료");
System.out.println("이름입력");
String name=sc.next();
System.out.println("가격");
int price=sc.nextInt();
System.out.println("재고");
int cnt=sc.nextInt();
System.out.println("카테고리");
String category=sc.next();
stmt.executeQuery("INSERT INTO PRODUCT VALUES((SELECT NVL(MAX(PID),0)+1 FROM PRODUCT),'"+name+"',"+price+","+cnt+",'"+category+"')");
System.out.println("로그 : DB연결하여 쿼리문 실행완료");
} catch (SQLException e) {
// TODO Auto-generated catch block
e.printStackTrace();
}
//3. 데이터를 write, read
// 1) connection 객체 => conn
// 2) stmt 객체 => read(SELECT),write(INSERT,UPDATE,DELETE)
//4. DB와 연결을 해제★
finally {
// 1) 연결한 순서를 생각하며 해제
// 2) conn -> stmt -> stmt xxx -> conn xxx
try {
stmt.close();
conn.close();
} catch (SQLException e) {
// TODO Auto-generated catch block
e.printStackTrace();
}
}
}
}
|
cs |
728x90
반응형
'DB > Oracle' 카테고리의 다른 글
| [Oracle] DELETE, TRUNCATE, DROP 차이점 (0) | 2022.12.04 |
|---|---|
| SQL 주요 함수 정리 (0) | 2022.07.13 |